How to obtain pictures with a better, more original light.
Dear Readers, dear Friends,
It happens quite often, that some of you see a picture -sometimes one of these published on my website and then ask me: How did you do that? How can I create that effect?
These questions come from people who are passionate about photography or simply from people who I have had the luck and honor to excite with one of my images.
It is my pleasure to respond to all of you: to share the passion for photography or to transmit a bit of what I learnt and experimented with over the past 26 years? Crickey… I’m getting old 
For the rest, I am more than convinced that good taste and a basic technical knowledge is sufficient to obtain photos with an effect.
So let’s start this series of tutorials talking about the white balance, which occured with digital photography being introduced.
A camera tries to analyse the light that illuminates the object that we are trying to take a picture of, with the objective of transforming that light into a neutral tone, closest possible to what the human eye perceives. In a way that the photo will then seem “natural”.
Light is a frequence, and colour is measured in degrees Calvin: to give you an example, sunlight is approx. 5.500 degrees Calvin, whilst a halogene light-blub gets to 3.800 and a neon blub to 2.200.
Usually a digital camera automatically finds the white balance, and then does a perfect job. Sometimes, however, to improve the photo you need to manually set the white balance or change the standard settings of the camera.
Simply hit the ‘Mode’ button and then below the subtitle WB, and you can find everything your camera can offer with regards to white balance.
It is, for examples, convenient to intervene taking pictures in the following two situations:
1) Sunset
In this case I’d suggest for you to set a temperature that could be much higher than that of the sun.

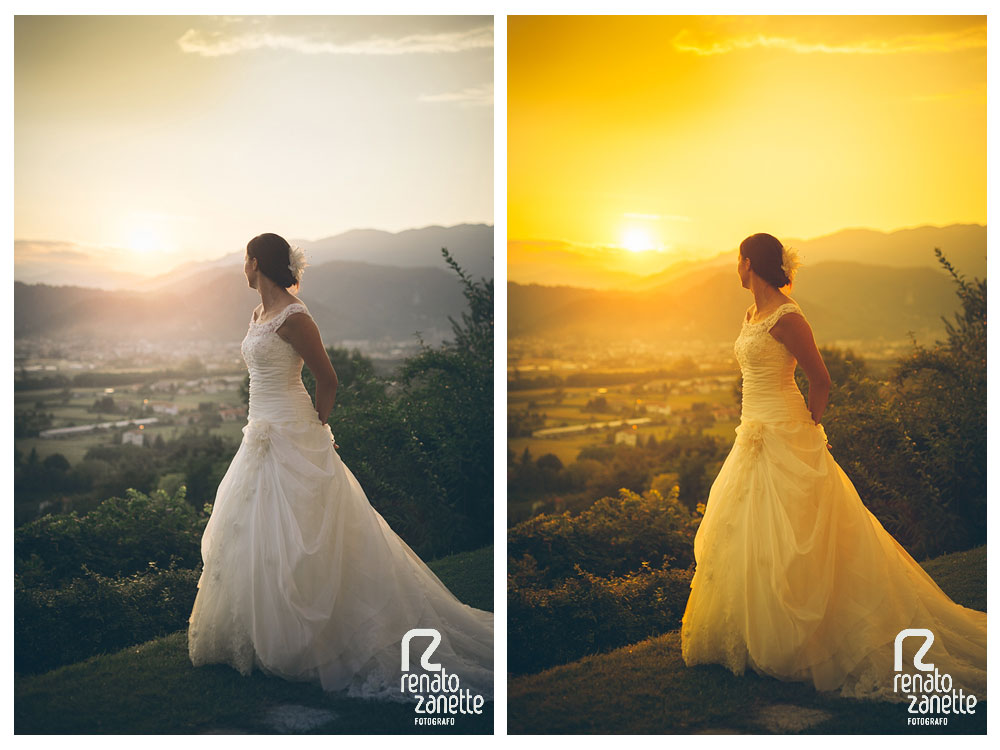
In the shown picture (pic. 1 and 2) of the bride Valentina, for example, the white balance is at 12.000 degrees, so the colours of the sunset appear even warmer… and more romantic.
Leaving the balance on automatic mode, however, would have let the camera balance out all colours, moving them towards a more neutral tonality. On the contrary, we have achieved a higher saturation.
2) Theater
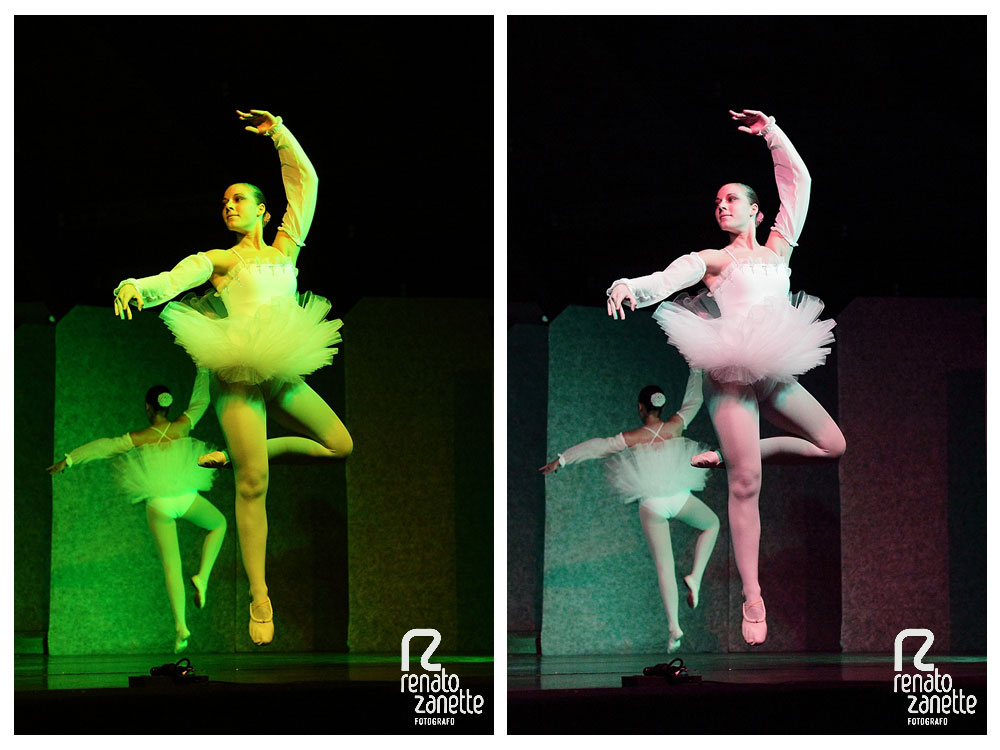
If you are taking a picture of a play at a theater, most of what you are aiming at is probably black, or not illuminated. And the camera has difficulties with that: in automatic mode it can’t find the best white balance, and the light of photos will result in being very different from what it really was when you shot it.


Look at these two pictures (pic. 3 and 4 or pic. 5 and 6) which I took in 2013 at a dance performance by Dance Point di Pieve di Soligo (province of Treviso) : same scene, two different white balances, two different interpretations.
If at the moment of having to shoot a picture you don’t have the possibilty to change the white balance, you can also do that later, in post-production, i. e. after downloading the pictures to your computer, using a good photo-editing programme.
To comment on this article, or if you would like to share other experiences on automatic white balancing going into tilt, to ask me for a suggestion, to contact me or to make suggestions on topics for future tutorials, you can write to me at info@renatozanette.it or contact me through this link: Contact
To see my photos: Portfolio
Remember that pictures are first created in your mind and then come to life through your eye and your camera.
Sending you best wishes,
see you back here for my next article…
Renato Zanette Photographer

